Jun 7, 2019

Apple Head Doll - Doris and Daisy (plus a link to my first video showing her magical creation)

You can find "Doris and Daisy" in my Etsy shop, Elusive Bobbin Studio.

Click here for a video featuring the creation of this doll.

Doris loves bright colors in her clothes 

and on her toes. 

She takes Daisy to the park for some fun


then kicks off her shoes to enjoy the sun.  


Jun 5, 2019

Apple Head Art Doll - The Peddler

"The Peddler" - SOLD

This will always be one of my favorite dolls.  

The first time I saw a peddler doll was in a collection of antique dolls given to me by my great aunt.  It was simple with a wooden egg-shaped head, not as fancy as the other porcelain dolls in the collection, but she was my favorite because of the trinkets in her basket. 

I saw my second peddler doll many years later working as a docent in a historic house museum in Memphis, TN.  The museum was hosting an exhibit of Victorian Toys for the Christmas season and among Steiff Bears, miniature pram, and other whimsies was an exquisite Peddler doll.  She was much more elaborate than my little wooden doll, and her basket was overflowing with treasures.

When I started making art dolls, making a Peddler doll topped my bucket list.

I hope you enjoy her as much as I do.


"The Peddler" has been sold, but please visit my Etsy shop, Elusive Bobbin Studio to see more creations.


Nov 28, 2018

Rewinding the Bobbin..Again, with a surprise.

It's been an eternity since I blogged here. Life got crazy, my figurative bobbins got all tangled into a horrible mess, and there may have been a health crisis or two. However, it's time to pick up the pieces, rewind those bobbins, give this blog a spruce up, and get going with new things. 

The best of those new things... 

I have an Etsy shop

The Elusive Bobbin Studio is now open for business. I've only listed a few Applehead Dolls and some Applehead Ornaments, but I'm adding more each week.  Be sure to check it out, and keep your eyes peeled for new content, including in depth looks at my highly detailed dolls right here on the blog in the weeks to come.


Sep 11, 2015

DIY Planner Pt. 3- Printable Menu Planner &Grocery List


In an effort to organize our meals, I've come up with this menu planner.  It prints on a whole sheet of paper.  Is folded in half with holes punched on the unfolded edge and placed in your mini sized binder.

Each week as you make your menu on the right side of the planner, you use the back of the previous weeks menu (on the left) for writing your grocery list.  When you finish, rip out the grocery list and you are ready to go shopping. 

Do you know what you're having for dinner, but not quite sure what night you're having it?  No problem.  The sections where you plan your dinners are numbered.  When you know which night of the week you'll be having them, enter the number under the weekday.


It's easy!  Just download here,  print, fold, punch, plan and go.

Sep 4, 2015

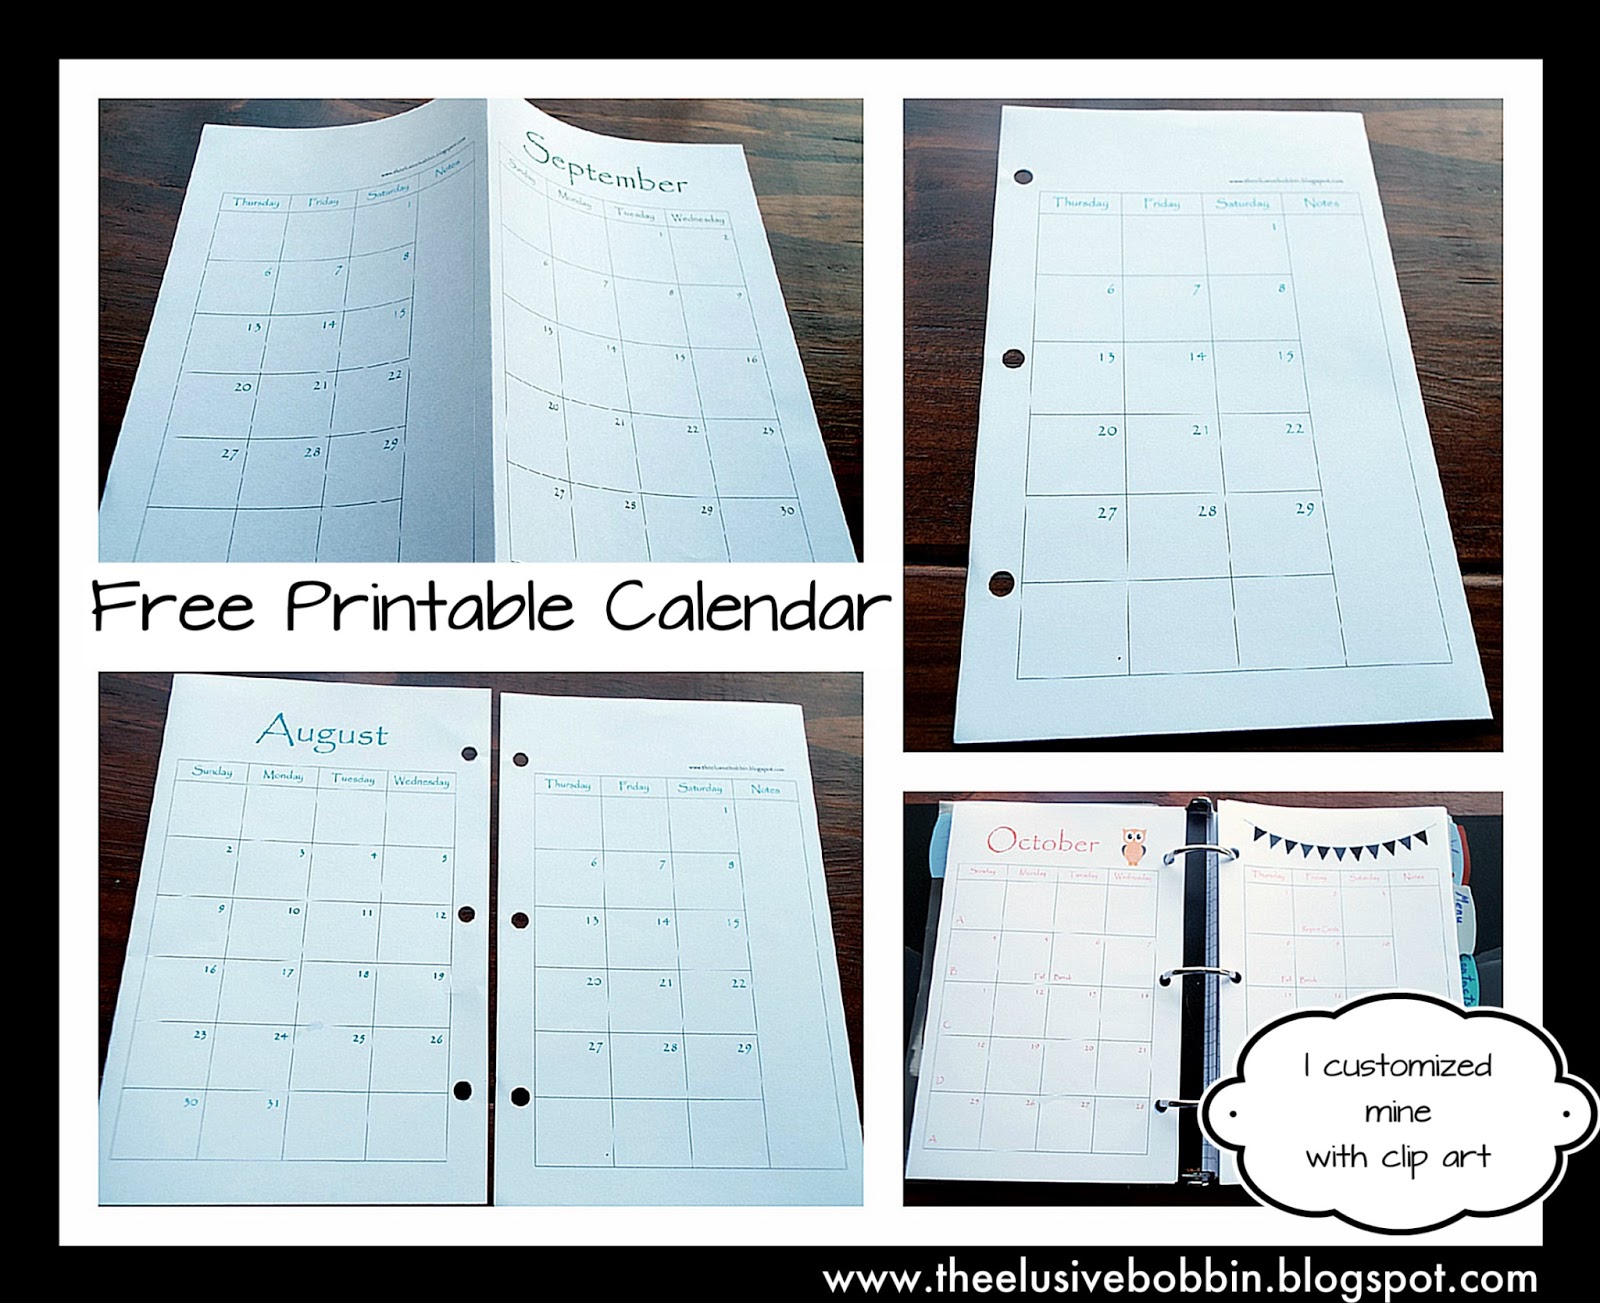
DIY Planner Adventure Pt. 2 - Printable Calendar

In Pt 1 of my DIY planning adventure I chose a size, what needed to go into my planner, and started gathering materials.  Now lets put those material to use and print a few things to into the planner. Every planner really needs a calendar, so lets start there. 

 If you do a google search for free printable calendar, there are plenty to choose from, even mini sized ones like what I need. But, I chose to take the extra time and make one from scratch using open office.  This allowed me to choose font, colors, add decorations, and customize days off and holidays.  I even added a notation on each week to keep track of my middle-school kids' rotating schedules.   

But my favorite feature of doing it myself, is the unique way the pages go into the binder.  Each page is printed with 1/2 of 2 months, so that when the pages are folded in half with back together, you see 1/2 of a different month on each side.  It sound confusing, but it works and translates to no cut pages and the ability to write with markers without fear of them bleeding onto the adjoining months.

I'm including a printable PDF file for a Plain Jane version of my calendar.  It has no decoration and no holidays, so you can write in whatever you like and add decorations as you wish.  


Sep 2, 2015

Mom Planner - My DIY Planner Adventure Pt. 1


As part of my New School Year Resolution to get organized, I decided I really need a planner of some sort to keep up with...well, everything.  But, I refuse to spend big money on a ready made planner that's not designed for my lifestyle, so I'm going to try to DIY one.  As I go, I'll share my process Step by step, show you what I learn along the way, and add links for free printable pages on the Mom Planner Page.

Step 1 - Choose a format.  

(Binder, Notebook, or Digital)
There are so many planner options out there these days. For me, a mini binder is the perfect choice, not too big, not too small so it's easy to carry.  I'm a visual and tactile learner.  Having pages to flip helps me keep info in my head.  I think that is why I have a hard time using a phone or computer as a planner.  I guess a bound notebook could also work, but I like the freedom to rearrange that a binder gives.   I can take pages out, put new ones in and instantly replace pages that are torn or messy.  My penmanship may be horrific, but messy pages play havoc with my OCD and leave me feeling irritated.  Irritation = emotional unbalance, so mini binder it is. 

Step 2 - Decide what to put inside.

One of my biggest organizational problems is keeping up with information, like dates and times of appointments, phone numbers (remember I don't use my cell phone so no one is on speed dial), and grocery lists.  

So for me, a planner needs to have sections for the following:

  • Calendar - needs to cover the entire school year, have room to write appointments, and ideally be expandable.
  • Contact Information - important phone numbers for doctors, dentists, the vet, emergency contacts and such.
  • Children - one section for each kid to serve as a place to keep up with school/activity schedules and things specific to each child.
  • Schools - one stop for school contact info and blank school notes to be filled out quickly on crazy mornings.
  • Daily TTD
  • Menu/Grocery Planning
  • Ideas - for blog or anything else.
  • Notes - filled with scrap paper to jot things down.
Step 3 - Gather materials:


Printer 
Paper
3-ring Pocket (sized to binder)

Aug 25, 2015

My New School Year Resolution - Get Organized

Jan. 1st usually has the market cornered on resolutions for most people, but not me.  Not this year.  No, this year, I'm getting a jump on the New Year's resolution by making a New School Year Resolution.  That resolution is to get and keep my "stuff" (with regards to kids, and house) together.

My big kids started middle school this year.  

It's a big deal.  

Up until now, they had the same teachers for the same subjects even if they weren't in the same classes.  I only had to deal with 5 teachers for them, plus one for my little guy.  But, this year, they have exactly one teacher in common.  With 5 classes, that should be 9 teachers right?  

Nope. 

Their school offers electives that last 9 weeks, 18 weeks, or the entire year.  Counting elective courses, my big kids have 16 teachers between the 2 of them.  That's a lot to keep up with. 

But wait, there's more!  Their schedule rotates from week to week.  For example: week 1 - classes go in order 1,2,3,4,5 week 2  -the order changes to 5,4,3,2,1 week 3 - it's 2,1,3,5,4 week 4 - they go 4,5,3,1,2.  The next week it starts over at 1.  Pretty odd isn't it.  
If I just wing this thing, I'll have lost my sanity by Thanksgiving, so a new system of organization is called for. 

I've already got a start on things and will be sharing loads of ideas and printables in the very near future so be sure to check back soon.  

Apr 10, 2015

F.F.F Strawberry,Pear, & Rhubarb Pie


I LOVE Strawberry Rhubarb pie!  So when I saw some beautiful fresh Rhubarb in the produce section right beside strawberries on sale, I knew pie would be on the menu.

This pie is a step away from the traditional strawberry and rhubarb version.  It adds pears, fresh ginger, nutmeg, lemon zest and a pinch or two of cinnamon.  The result is amazing as long as you like strawberry and rhubarb pies.  Lucky for me, my daughter is the only other person in the house with any interest in this magically tart and sweet combination, so we had it all to ourselves.

Strawberry Pear & Rhubarb Pie
2 large stalks of Rhubarb with strings removed and chopped
1 lb Strawberries chopped
2 Pears chopped I used Asian Pears
Zest of one Lemon
1/4-1/2 tsp freshly grated Nutmeg I love nutmeg so I go for the full 1/2 tsp
1/4 tsp. freshly grated Ginger
1/4 -1/2 tsp cinnamon
Sugar to taste depending on the sweetness of your fruit. I used  3/4 C
Thickener of your choice.  I used 11/2 Tbs. corn starch and 1 Tbs. tapioca flour because it was what I had on hand
1 or 2 pie crust  I went with a store bought gluten free crust single crust to save calories over the traditional double crust version.  However, any crust recipe will do and a double crust could be used.


Directions:
Prep ingredients and pie crust.  Mix first 9 ingredients well but gently.  Pour into prepared pie crust.


Bake at 350 degrees til crust is golden brown and filling is bubbly. Let cool and enjoy as is or add a dollop of whipped cream.  This pie is also excellent with a scoop of ice cream on top if you can wait til it cools, or on bottom with the pie as a gooey topping if you can't wait.


Mar 26, 2015

Victorian Vanities - Sea Foam Hair Cleanser


In case you didn't like Shampoo Cream, here is another hair cleansing option from The Era Formulary:  5000 Formulas for Druggists, printed in 1893.  This one for a "Sea Foam" and is found with other Sea Foam options on p. 194. FYI, Sea foams don't suds up like modern or not so modern shampoos, or soaps.  However, the ammonia and Alcohol are sure to cut any grease from ones hair whether natural or added.  They are also supposed to create a light foam when used.  I've gotten my nerve up to give this one a try if I can endure the fumes and will post my results later.  However for now, enjoy the recipe:


2143. 
Sea Foam
Glycerine 1 ounce.
Ammonia 2 ounces.
Alcohol 16 ounces.
Water enough to make 32 ounce

UPDATE:

General Observations:
The name is a bit misleading.  I got no suds, no foam.  Now maybe my hair was too clean and on "period styled" hair laden with fat rich products, some kind of saponification might take place, but I have my doubts. 

This stuff smells very strongly of ammonia and alcohol.  Not the most pleasant smelling stuff.

Results:
My hair seems very clean and soft (from the glycerin). 

My color treated hair is lighter than before the wash, so I'm guessing the ammonia strips some of the color.  It was time for a touch up anyway.

Would I use it again?
Probably not.  Unless I've used a heavy pomade and need to strip the waxes and oils from my hair.

Mar 22, 2015

Victorian Vanities - Shampoo Cream


The History
Compared to our Victorian ancestors, we wash the dickens out of our hair.  The idea of a daily washing would have seemed at best, ridiculously excessive, and at worst, dangerous to great great great grandma Flora.

In the 1850's and 60's, and to some extent, the 70's and 80's frequent washing was also counter productive to creating a fashionable style. That is because preferred hair styles were smooth and sleek. Wild frizzy hair just didn't cut it, and though there were plenty of styling aids available, natural oils from the scalp do a fabulous job taming one's mane at no additional expense.  During this time, you can find references that swear all one's hair needs for cleansing is careful brushing, a rinse in the purest of water, or if very dirty perhaps a homemade egg shampoo.  

As hairstyles change toward the end of the century and sleek styles give way to frizzy fringes and more pouf, oily hair can't keep up, and cleansing practices change.  We start to see more recipes for hair cleansers that contain soaps, or other oil cutting ingredients.  We also see beauty advice that recommends regular cleansing with gentle washes or the use of hair powders to absorb excess oil.

It is fun to note that even in the 1890's one can find druggists recipes for shampoos that are made with egg.  On page 193 and 194 of The Era Formulary:  5000 Formulas for Druggists, printed in 1893 you can find 4 different recipes using eggs.  Two call for the white, one calls for the yolk, and the last calls for the entire egg.  Depending on the formula, these egg shampoos contained additional ingredients like borax, ammonia, alcohol, rose water, fragrance, and even tincture of cantharides, an extract from the blister beetle which causes skin irritation.

The Recipe
For my Victorian Vanities presentation, I created 2 recipes from the above mentioned book.  Neither contain eggs, but both are unique in their own measure.

The sample recipe I'm sharing today is for Shampoo Cream and is taken from page 193 of The Era Formulary, mentioned above.

2127. 
Shampoo Cream
Soap (fine, white. in shreds), 1/2 ounce,
rose water, 1 fluid ounce,
solution of ammonia, 1 fluid ounce,
alcohol or bay rum,1/2 fluid ounce,
rain water, 8 fluid ounces.

Dissolve the soap in the rain water by heat, and when nearly cool add the ammonia, rose water and alcohol, stirring constantly.

Observations
When I first made up this "shampoo cream", I went back and checked 3 times to see if I had missed something in the recipe because there was nothing cream like about it.  It had the consistency and appearance of water.  However, after standing for 3 days, the solution began to thicken.  After a week of resting with periodic shaking, it was definitely something one might call a cream, albeit a strangely congealed and gloppy one.

After a months time sitting on a shelf, it has separated, but a quick shake and it's back to it's gloppy self.  I have no idea how this works.  I'm still a bit hesitant to try it. 

Mar 14, 2015

Victorian Vanities - Cold Cream


If your following my blog day to day, you might find it odd to see a post on cold cream right after a post on choosing a design for a new bed, but it takes time to decide, plus I have a cold and until it's gone, I don't foresee "getting my build on".  So to honor said cold in hopes it passes quickly here's a bit about cold creams.  

Origins
Cold creams can be traced back to ancient Rome where they are believed to have their roots with Greek Physician, Galen of Pergamon around 150 A.D. The first cold creams were created by melting olive oil and beeswax together, then adding water when nearly cool and whipping the bejeezus out of it.  

This concoction  had a short shelf life, it was prone to separation, and the oil went rancid with time.  By the early Victorian times, this formula had changed only slightly replacing the olive oil with almond oil, and the water with rosewater.  The cold cream smelled nicer, but still had a short shelf life. 

 Uses
Cold creams were used as moisturizer, face pack, cleanser, balm, and even as a shaving cream (by men).  In the 1940's they served as a primer/adhesive for facial powders, and are still popular with many women today. 

Why Call it "Cold" Cream?
When applied to the skin, the water evaporates giving a cooling sensation.  This cooling sensation is one possible explanation for why we call this concoction cold cream.  Another possibility is that the name comes from the cream being kept in cold or cool storage to prolong it's shelf life.   

Advancements
In 1876, Vaseline(introduced in 1870) made it's way into some cold creams replacing the almond oil and creating cold creams that were cheaper and would not go rancid.

In 1883 Adoph Vomack introduces a formula with borax.  The borax worked with the beeswax to form an emulsion that would not separate, even if oil was used instead of Vaseline.  These borax beeswax creams were slightly pearlescent which many Victorians took as a sign of quality.  

In 1890 we see the first commercial cold cream that contains both Vaseline and borax.

Examples/Recipes
This is a traditional almond oil, beeswax, and rose water cold cream created from a recipe found on p. 233 of The Druggist's General Receipt Book by Henry Beasley printed in 1878.

This reciept/recipe calls for:
4 parts almond oil
1 part white wax (beeswax with scent and color removed) 
3 parts rose water.  

The resulting cold cream smells and feels amazing.  I find that the beeswax help protect my hands in the winter when they are prone to chapping from frequent washing.  In the picture below, you might be able to see the downside of this formula.  less than one month after creation, even stored in ideal conditions, droplets of water are starting to separate out.  In a previous recipe, I added a small amount of borax to this recipe and the cream remained intact for nearly 2 years, even though the oil had begun to smell less than fresh.

The Vaseline cold cream below was made from a recipe on p. 170 of The Era Formulary written by D.O. Haynes and printed in 1893.

The recipe(#1842) calls for:
  75 parts white wax
  75 parts spermaceti* 
450 parts almond oil
200 parts Vaseline
200 parts water
  10 parts borax
       perfume q.s. (as needed)
*( I use Jojoba oil as it is the closest readily available substitute)

This recipe is very stable including both borax and Vaseline.  It is easy to make and feels great, but I do think I prefer the previous recipe freshly made or with borax added.

Want to DIY Some Cold Cream?
  • Check out the books I've mentioned above.  They both have recipes for other cold cream variations listed on the same pages as the recipes I've given.
  • Melt your wax and fats/oils together slowly in a double boiler set up.  Remove from the heat and slowly add the water while mixing with a hand held electric mixer.  Originally, this beating was done by hand and took a very long time.  Using a hand mixer gets the job done quicker and you end up with a very uniform product.
  • As with all cosmetics, try and use at your own risk.  Please remember common perfuming oils like orange, bergamot, and lemon are photo sensitizing (they will increase you risk of sunburn where applied)
If you DIY your own cold cream, please leave me a comment and/or picture and let me know how it turns out.


Mar 12, 2015

King Bed Build Pt.1 - choosing a design

Spring is almost here, and I can't wait.  It is the perfect time to get outside and start new projects.  This year, the project topping our list is a new bed.  Years ago when we first got married, we received a 4 poster queen sized bed complete with mattress set as a gift.  It was a "starter model", but we loved it, especially since it was free.

Flash forward too many years and 3 kids later and I'm a lot older and little wiser. 

I now understand why my mom told us not to jump on the bed.  Two words,... broken springs.  
I've also learned that a six year old who climbs in your bed in the middle of the night, takes up more mattress real estate than a full grown man.  

So, with tax refund on it's way, and President's Day sales in full swing, we bought a new mattress set just a few weeks ago.  We even upgraded and got a King.  It is glorious.  However, there is one tiny problem.  This upgrade has left us without a frame or headboard.  And there is only one solution for that.  


DIY it.


But what to build?

I really like this farmhouse bed from Pottery Barn.
Alternate View


Here are some similar ones with plans.
 picture from: The Bumper Crop
free plans from: Ana White


Plans by: Ana White


Plans by: Ana White


But, I also like these other Pottery Barn beds.
View in Room

Dawson Bed

Addison Headboard
Feel free to chime in in the comments section and tell me what you'd pick.

Mar 9, 2015

Victorian Vanities - Mouth Pastilles

O.K. this is the last "Dental Cosmetics" post.  
I promise.  

Today we're delving into the world of Cachou Aromatise/
Mouth Pastiles/Pastilles/Breath fresheners.  

In old formula books these recipes are sometimes found in the perfumery section rather than with tooth powders or other mouth cosmetics, as their purpose is to purify and perfume the breath.  

It seems that a great number of recipes for breath fresheners originally contained Catechu, an extract of the acacia tree which has astringent properties.  Catechu was mixed with other aromatics like orris, peppermint, ambergris, musk, licorice, clove oil, or cinnamon, then formed into small pieces or pastilles which one would chew or allow to dissolve in the mouth to perfume the breath.  

For my presentation, I made 2 "breath fresheners".  Both can be found on page 201 of The Druggist General Receipt Book by Henry Beasley printed in 1850 which is available free for download on Google books.  


"Pastils or Lozenges, with chlorine, 
for disinfecting the breath"
Sugar flavored with Vanilla 1 oz.
Powdered Tragacanth 20 gr. (grains)
Liquid Chloride of Soda q.s.(as needed)
Any Essential Oil 2 drops

Form a paste and divide into Lozenges 15 gr. each.

These little beauties have a faint swimming pool aroma when they are freshly made, but that fades quickly and soon all you smell is vanilla and whatever essential oil you used.  I have not tasted these, and don't plan to.


M. Chevallier's Aromatic Cachou
Chocolate Powder 1 1/2 oz
Ground Coffee 1 1/2 oz
Prepared Charcoal 1 oz
Sugar 1 oz
Vanilla 1 oz (pulverized with sugar)
Mucilage q.s. (as needed)

Make into lozenges of any form. 

The description in the original text mentions these are good for smokers.  The charcoal pastilles have a smell that is heavy on the coffee and light on the chocolate.  I did taste test these and think you could recreate the flavor yourself by chewing equal parts sugar and coffee grounds.  As you might expect, these don't taste great, but if you're into espresso, they are tolerable.  

The gritty texture and lovely shade left on and between my teeth by the charcoal however, was not tolerable.  I ended up spitting out the black slurry and rinsing my mouth til the water ran clear- 4 or 5 times.  I will not try these again since I found them to be very irritating to my gums.

The Aromatic Cachous/Charcoal mouth Pastilles recipe above can also be found almost word for word on p.200 in: 
The Era Formulary: 5000 Formulas for Druggists printed in 1893 by D.O. Haynes.   
It is formula 2215.

Another very similar recipe can be also be found on that page and goes uses the name pastilles.  

p. 200 formula 2220.  
 Pastilles (Aromatic)
Roasted Coffee 75 parts
Wood Charcoal 25 parts
Boracic acid 25 Parts
Sugar 60 Parts

The ingredients are pulverized separately, then mixed will sufficient vanillin to perfume and enough gum arabic mucilage to "make a mass."  The mass is then to be divided into "pastilles, lozenges, or little pills".

Mar 8, 2015

Deschamp's Acid Dentifrice


I've got one more dentifrice for you.  

This one comes from  The Druggist's General Receipt Book. 8th ed. p. 258 by Henry Beasley printed in 1878 in Philadelphia and currently available on Google books for free download. 

Two variations are listed in this  book:
  
 Deschamp's Acid Dentifrice 
4 parts chalk
1 part baking soda
1 drop oil of mint or perfume per total ounce of powder
1 grain carmine per ounce of powder

Deschamp's Alkaline Dentifice 
4 parts chalk
1 part baking soda
1 drop oil of mint or perfume per total ounce of powder
1 grain carmine per ounce of powder

The carmine in the above formulas is used as a colorant and would give the powder a pink hue.  As you can see, from the picture above, I chose to leave it out but might add it in the future.

BTW, Henry Beasley wrote several books like this, which were compilations of formulas from various sources.  

Some of his books even contain information on veterinary medicine and perfumery.  From what I have found, his books and their reprints span from 1848 with The Pocket Formulary to 1886 and beyond if you include modern reprints. 

Many of these are currently available for download from Google books, and others are available for purchase.  I have been unable to find much biographical information on him, but should you discover any, please leave me a message and your source, and I'll be sure to include it and give you a nod.

Mar 6, 2015

F.F.F - Minecraft Bus Birthday Cake.

What do you do when your about to be six year old declares that he wants a Minecraft birthday cake (for the second year in a row), but it has to have a school bus?

Give it to him.  And let him lick the spatula of course.  It's his birthday after all.


In the spirit of full disclosure, I've been sitting on these pics since before Christmas, which just goes to show how busy it gets around here.  But now I've got time so you get to see them.  

I'll also admit this wasn't my best work.  His birthday is very close to the holidays and by the time I get to his cake, all too often I just want to get it done.  However, no worries, because as imperfect as it is, Little Guy loved this cake!  After it was finished, he decided we needed to add some animals.  I let him put the animals on by himself, which may explain why the pig has so much personality.


I'm also left wondering about the placement of the cow, but he liked it so who am I to judge.

Mar 5, 2015

Victorian Vanities - Saccharine Preparation

formula 1350 from The Era Formulary
Here's another Dental cosmetic for you.  It is used as a gargle and goes by the name "Saccharine Preparation".  

Who knew saccharine has been around for so long.  It was discovered in 1879 by Constantine Fahlberg and soon found it's way into everyday products.  The two recipes bellow are from p.129 of The Era Formulary. 5000 Formulas for Druggists published in 1893. 

1348. 
Saccharin Preparation for the Teeth.
Saccharin 1 gram.
Tincture of myrrh 5 grams.
Lavender water 95 grams.
Mix. Half a teaspoonful to a teaspoon ful as a gargle and mouth-wash after meals. Use undiluted. 

1350.
Saccharin Preparation for the Teeth
Saccharin 30 centigrams.
Borax 10 grams.
Peppermint water 50 grams.
Distilled water 450 grams. p.129 1350