Showing posts with label Sewing. Show all posts

Oct 29, 2014

1927 Singer Sewing Cabinet Restoration Pt. 3 - removing the treadle frame and drawer supports.

It's been an all out eternity since I've posted anything about Freddie Mae.  But I haven't forgotten her.  If you've not read about my lovely singer sewing machine "Freddie Mae" and her restoration, be sure to check out the other posts here.  But if you're all caught up and ready for an update, read on.

Where were we?  Oh yes, I had finished the restoration of the sewing machine head, and was ready to move on to the cabinet.  I believe I also waxed poetic about why disassembling a piece prior to restoration is a pretty good idea.  

But how does one disassemble a vintage Singer sewing machine cabinet?

First cover your work surface, remove the drawers, then flip that puppy upside down.


With everything unscrewed you can remove the drawer frame.  Cringe at the dust and spider parts.


Separate the top of the cabinet from the treadle frame.  It should just lift off, but it'll be super heavy.  It is cast iron after all.


If you've gotten this far without finding copious amounts of dirt or other cringe worthy findings, and your finish is pretty good, you could stop disassembling here, give everything a good cleaning and a coat of wax and put it back together.

Or, if you're like me you could move onto the next stage. 
(Coming Soon)

Oct 20, 2014

Mama Gets a New Dress - 1950's Style

If you've been following along with any of the 1950's girls dress posts, then you knew I was also working on a dress for myself to wear to my cousins 1940-50's themed wedding, and here it is.


 We looked rather nice I think.  Since I was in such a hurry to get this done, I don't have many pictures.


I used this pattern.  It went together nicely with few alterations.

The fabric, and the scraps.


We almost got everyone in the shot.  I wonder where big brother got off too?

Oct 15, 2014

Finished 1950's Girl's Dress

Remember the patterns I showed you a while ago?  

Well, here is my daughter's  finished dress based on the Butterick pattern above.  


Above:  My sweet girl with her cousin Cash.

Left:  "Really Mom?"

Below:  My favorite picture.  Isn't the setting gorgeous.  FYI, this was later in the day and she was tired of wearing the crinoline.  I love how  this dress transforms to a 1940's style if you remove it.  She looks so grown up.  


Did you miss something?
Pt. 3  - Trick for well matched seams

Up Next
Mama Gets a new Dress


Oct 13, 2014

1950 Girls Dress- a few tricks for well matched seams


I was so excited when I found this fabric.  It met my daughter's requirements for "not girly" and was a nice small geometric that I thought would match well.  However, I made a huge mistake by not checking to see that is was printed on the true grain and guess what.  It wasn't.  What I thought would be a quick and easy match job turned into a nightmare!


Luckily, I have a few tricks to deal with that sort of thing, and that starts with the right tools: Lots of pins to help match pattern points, wax crayon to mark cutting lines, and chalk to mark seam lines and pattern marks.


I'm a huge fan of chalk, and always mark my seam lines when doing precision sewing.  For the center front piece below, I placed the pattern on the fabric so the center front fell at the center of the fabric design.  I marked the seam with chalk, then folded the fabric right side out along the center front.  Smoothed the fabric gently, then gave several swift taps along the seam line to transfer the chalk to the unmarked side.  Open it up a viola, all the lines have been transferred.


Lots of patience and some fiddling with layout, got  decent results for the shoulder seams above-left.  But nothing could give a perfect continuous pattern match on the center back, so I settled for a mirror image match.  Because the pattern wasn't true to the grain, I ended up sewing the seams from the seams I cared about by hand from the right side.  I went back with my machine to reinforce from the wrong side where necessary. 


With the bodice sewn, it was time to check and see how the skirt was going to fall over the petticoat. 
 Not bad.  though it is hard to get a good feel for the finished product with the seam allowances poking out.  

Up Next

Pt. 4 - Finished Dress

Did you miss something?

Oct 6, 2014

Sewing a 1940's-50's outfit pt. 2 the crinoline


By the time you read this, I've made not one, but 2 crinolines.  One for myself, and a second one for my daughter.  Considering you can buy one for around $40, I'm not sure I would ever do it again.  This was a rewarding project, but also a real pain in the tush-cus.  

So, why did I do it? 

The short answer is I'm cheap.  I hate to buy what I can make for less, and it just so happens I had an old wedding dress from a friend of a friend's first marriage, and it had tons of crinoline and lining fabric just waiting to be re-purposed.  That made my total expense for both crinolines less that $20.

The construction process was not complicated, but it was time consuming and super annoying trying to wrangle so much fabric.  It's also not something to attempt without a gathering foot, or a pleating attachment for your machine, or an insane amount of patience. 

Sorry folks, there's no tutorial on this one.  Sadly, there was too much of a time crunch. But here is a glimpse at the construction from the bottom up.  


The yoke is cut along the line of the dress through the waist and hips.  For my daughters dress, that means it is fitted with darts.  For mine it was gathered.  A wide strip of gathered and hemmed lining fabric is attached to the bottom of the yoke.  For my daughter, I used organza because it gave a little more umph.


The second layer was made up of crinoline fabric harvested from the wedding dress.  It was cut in strips so the width of the strips was half the distance from the yoke to the hem, plus seam allowances.  These strips were sewn together, gathered with a gathering foot, and stitched along the bottom of the yoke, on top of the lining/organza seam.  A second strip of gathered crinoline, was sewn to the bottom edge of the first, to create a tiered skirt.  I actually sewed the tiers together first, the attached them to the lining.


The first layer of tulle was cut, gathered, and attached in the same tiered manner as the crinoline fabric.  A second, final layer of tulle was sewn in a similar manner to the first, only instead of 2 tiers, it has 3 and is attached to the top edge of the yoke.  

The top of the yoke, was then sewn to a 3" elastic "waistband" and a hook and eye closure harvested from a bra extender kit was sewn to the elastic.  The back seam is left open for about 6-8" below the hooks and eyes. 

My Petticoat was done in a similar manner to my daughters, using light green tulle instead of blue.     


With everything assembled, the final step is to hang the petticoat on the mannequin and trim the bottom edge where needed so the layers are even.


Next up, 

Pt. 3 Matching Seams
Pt. 4 Finished Dress

Did You miss Pt. 1?
Sewing a 1940-50's Girls Outfit
  

Sep 10, 2014

Sewing a 1940's-50's Girl's Outfit - Pt. 1

Last week, I offered up my post "Cake and Crinoline" as an explanation for why I'm putting my other projects on hold.  I'll be showing off the cake on this week's "Fun Food Friday".  

But you won't have to wait that long to get a glimpse of the Crinoline part of that post. 

With only 16 days until the wedding, it is time to get serious about making outfits for the upcoming 1940's/50's themed wedding.
.   

Step 1  Find a pattern.  
With so little time, I have no interest in drafting 2 patterns from scratch.   Luckily, I picked up these 3 vintage patterns at a yard sale about 7 years ago.  A quick rummage through my pattern file, and they are now in my hands.  

As I scan the back of the envelope, I feel a rush of excitement.  Could it be  true?  I double check the numbers.  YES!!!!!  The Butterick pattern (the bigger image) is just the right size for my daughter.  A chorus of angels begins to sing, while rainbows, and songbirds fill the air. 
O.K., not really, but I was very happy.   

Step 2  Find the fabric.
I found so many adorable vintage style prints that would have been perfect, and every single one was shot down by my daughter who insisted in THE TONE.


 Her:
"mom, you know I'm kind of into solids, right?"  

Me:
 "o.k. come to the fabric store and help me pick something out."

Her:
Silent, as a look of terror spreads across her face.

 Despite my threats of choosing something very pink 
(she wanted blue) 
with huge cabbage roses and lots of frilly stuff 
(we're in that I don't want to be cutesy phase)
I ended up at the store alone.
Sigh.......

Finally, after a ridiculous amount of agonizing on my part,  I choose a very simple fabric with a grid of dotted white lines forming diamonds on a blue back ground.   


The verdict:
"It's nice" she says.

Next time, kiddo, it's cabbage roses all the way!!

Step 3 Fit the bodice.
This is when things got tricky.  In my excitement to choose a pattern, I didn't realize the front bodice pattern piece was missing. Luckily, the front facing was there. I used it along with the back bodice section to draft a new piece for the front.  I have plenty of muslin on hand, so I cut out the bodice section, basted it together and tried it on her.

Hmm... a bit long and blousy.  But what did I expect, the kids got a high natural waste and she's still on the willowy side.
A few strategically placed pins later, and all was well.  I marked a new waistline and released her from the "torture"(her word) of fitting.

Next up, 
Pt. 3 Matching Seams
Pt. 4 Finished Dress

Apr 23, 2014

1927 Singer Sewing Cabinet Restoration Pt. 1 - Assessing the Damage

Warmer weather is here!
  
The garden is planted and although free time is still hard to find, I'm making time to turn my attentions back to Freddie Mae, or more specifically, her cabinet.  

 It wouldn't be right to put her back into a time ravaged cabinet, now that she's been revitalized, would it?


Step 1 Assess the damage.

Like other singer cabinets of it's time, this one rolled off the factory floor with a pristine shellac finish.  But time and water have taken their toll.
(shellac really doesn't like water, and that's it's downside) 


Looks pretty bad doesn't it?  Believe me it's worse in person.  

The bad news: 

The top is in bad shape.  In addition to the obvious water damage, there are speckles of what I believe to be white paint on the top plus, the veneer has lifted in a few spots.  

The bottom line is that the finish on the top can't be saved.  It'll have to come off.  But that's the upside to shellac.  It'll be pretty easy to remove and I think, I can manage it without loosing too much of the patina.  

The good news:

 Aside from a few small scratches and some dirt, the sides are in good shape and won't need to be stripped.

  The plan:
  • Disassemble the cabinet.
  • Use denatured alcohol and very fine steel wool to remove/level the worst of the shellac on the top.
  • Clean the rest of the piece with my new favorite homemade fine furniture cleaner.
  • Apply a fresh coat of boiled linseed oil.  
  • Add a fresh coat or two of shellac.
  • Buff with superfine steel wool to remove the "brand new" feel.
  • Apply a coat of good quality furniture wax.
  • Put it all back together.
Next Up:


Mar 6, 2014

1890's Costume Challenge -Inspiration and Patterns

Now that I'm no longer in a sewing frenzy, it is time to play catch up on the 1890's costume challenge.

The Inspiration

 I spent alot of time looking over scaled period patterns, costuming books, fashion plates, and period photos to get a feel for the 1890's.  I decided pretty quickly that I would make a simple skirt but really had no idea what to do for a bodice until I saw this ensemble in Costume in Detail. I fell in love with the ruching on the bodice and knew I wanted to incorporate it into my costume. 


For my purposes, I really like this style of bodice and yoked bodices in general.  They have a more relaxed look and fit than their smooth fitted counterparts.  Because of the extra ease build into the front, they make fabulous "work" garments allowing greater mobility and less precision in fitting, thus saving a bit of time.  Plus, the extra fabric at the bust does wonders to conceal the top edge of the corset, which is really great if you don't have time to make a proper corset cover.

The Patterns

My salvation on this project was a set of "Natural Form" patterns from Truly Victorian, that I got back before my youngest was born.  
They include:

* the above images courtesy of Truly Victorian

Way back then, I made the corset (which I cannibalized for my current project), and a mock up of the jacket.  Everything fit and looked fantastic. 

Then, I found out I was expecting my youngest.  With a little one on the way, and growing belly,  the project and it's restrictive corset were joyfully tucked away in the closet, behind my maternity clothes.

Fast forward 5+ years to Feb. 2014, when I find myself in need of a costume which would be suitable for 1888-1900.  This set of patterns instantly springs to mind.  

Sure, there are some style changes between the 1880's and 1990's but altering a working pattern with seams in the right places is much quicker than starting from scratch.  

I made the corset according to the pattern directions, keeping the CF and CB of my original cannibalized corset as they were, complete with spoon busk and lacing grommets already in place.  I cut all the other pieces to my new measurements, basted them into  a mock up which fit perfectly, and then proceeded with the final assembly.  

The petticoat was cut according to the pattern instructions for view 4.  It was easy to construct, but those ruffles were tedious even with the help of my ruffeler.

The bodice is where it got tricky.  Although I dabble occasionally, I'm no expert pattern maker and what I've learned is from trial and a lot of error.  I wanted so badly to find a good tutorial on how to adjust my fitted bodice pattern to the new style, but didn't.   So, I was stuck winging it.  Now that the project is finished, I'm pretty happy with how it turned out. 

In the future, I hope to do a quick tutorial about the changes I made  to the bodice pattern, so check back later if your are interested.  

If you know of a good tutorial for making similar changes, please send me a link and I'll include it below.

Mar 3, 2014

1890's Costume Reveal

I finished my 1890's costume just in time.  It isn't perfect, but it was perfectly fine for Saturday's cooking extravaganza with fellow volunteer, Wendy Neff, in the Meals house at Burritt on the Mountain.  This is what our table looked like about halfway through the day.  We aren't the tidiest of cooks, but our food tastes amazing. We were so busy during the day, that I didn't get a picture of myself in my building.


However, Kelly Fisk, the historic park supervisor, was kind enough to take my picture for me at the end of the day in the Balch house kitchen next to the old wood stove.  Check out the hair.  I swear it ages me 10 yrs.


Feb 25, 2014

1890's Costume Challenge - Petticoat

I didn't get as much done as I'd hoped for yesterday.  As usual, I  underestimated the labor involved.  Actually it's more a case of I didn't realize the petticoat has about 15 yards of ruffles, 10 of which also required a narrow hem.  The thought of basting and drawing up all those ruffles, not to mention turning that hem by hand made me kind of queasy.

10 +  yds. all hemmed nice an neat, ready to be gathered.
Then, I remembered that my New Home Sewing Machine, circa 1947, has a hem foot and ruffler attachment.  Unfortunately, the tension on it was totally messed up.  But it was definitely worth my time to try to fix it.  After a few minutes on Google and few more making adjustments, it was working again.  I had to wind the oddly sized bobbins on my modern machine, since the rubber bobbin wheel is rotted and I've never found a replacement of the right size, and it did take me about 15 minutes to get the ruffler set just right, but it was worth it. 


The really neat thing about this ruffler is that it has the ability to gather a ruffle and sew it simultaneously to an ungathered base fabric or apply an ungathered trim to the top of  the fabric you are gathering all in one step.

I don't trust my skills on this machine enough to try that yet, but I imagine back in the day this was an amazing time save.  I may try it out on my next petticoat.

Feb 24, 2014

1890's Costume Challenge Update

Apparently I'm not as good at multi-tasking as I hoped, which is why I've not managed an update before this, and why there are no pictures.  Still, better late than never.

So where do I stand? 

  • Corset- Not finished but wearable.  Top and bottom edges need to  be bound and it may or may not happen before Sat.
  • Bodice, Petticoat, and Corset cover- Cut out, will try to sew today.  My Singer 66 has some awesome attachments that would really help with these, but it isn't sew worthy yet.  Sigh....
  • Skirt- Bought the fabric on sale yesterday and will wash it today.
So much left to do and so little time. Looks like I'll be playing blog catch up when all is finished.  There will be pictures. 

Feb 18, 2014

1890's Costume Challenge

In exactly 11 days, I will be doing open hearth cooking at Burritt on the Mountain, which is not unusual, because I do it about twice a year.  I usually cook in the Meals house and wear my 1850's ensemble.  I look quite convincing in front of the hearth in my 1850's restored building.  

Photo by Eric Schultz, The Huntsville Times 

Then, in May 2011, the unimaginable happened.  The Meals house was jacked up, placed on a flat bed and driven very slowly across the green to the 1890's side of the Historic Park.  

Immediately after the move, the interpretation of the building was up in the air so I continued to cook in my 1850's get up.  Now it is officially interpreted as 1890's, and I feel out of place in my "old fashioned clothes". I've tried cooking in  other 1850's building, but I miss "my house".  So I am challenging myself to create a 1890's ensemble in time for the March 1st open hearth event.  

I have 11 days to draft, fit, cut and construct everything that won't carry over from my 1850's outfit.  That means I have to make a new corset, petticoats, skirt and bodice at the very least.  

I'm using Truly Victorian's TV 110 1880's corset pattern, which I made up before my last child was born.  Since my body hasn't bounced back, and may never bounce back, I'm going to cannibalize that corset for parts for the new one.  Luckily, I still have some quality corset coutille from that project so I can reuse the front busk section and back lacing sections thus saving a huge bit of time.  As of last night, I've adjusted my corset pattern to my new measurements, and I'm ready to make a mock up.

Things to do today
  • Check my stash for fabrics
  • Deconstruct the old 1880's corset
  • Cut out and construct a mock up for the new corset
  • Check for fit and be ready to cut and construct the final corset tomorrow.
  • Decide on skirt and bodice or dress pattern.


Jan 29, 2014

1927 Singer Model 66 Restoration Pt. 9 - Freddie gets Microdermabrasion

 Poor Freddie.
Her youthful complexion is gone, 
replaced by:

Fine lines  

rough crepe-like skin, 

odd spots here and there, 
and a general lackluster appearance.

Lucky for her, I can reverse some of the damage.

Before I get into the how, let me be clear about the why.  

I want to make Freddie a functional machine again. I see some dainty and delicate fabrics in her future.  So, functional equals a clean, smooth finish.  I also want to stabilize her finish, which has been compromised, to protect what is left of her decals and prevent further damage.       

Step 1:  The Gentle Approach
  • Start by gently wiping off the loose dirt with a dry cloth.
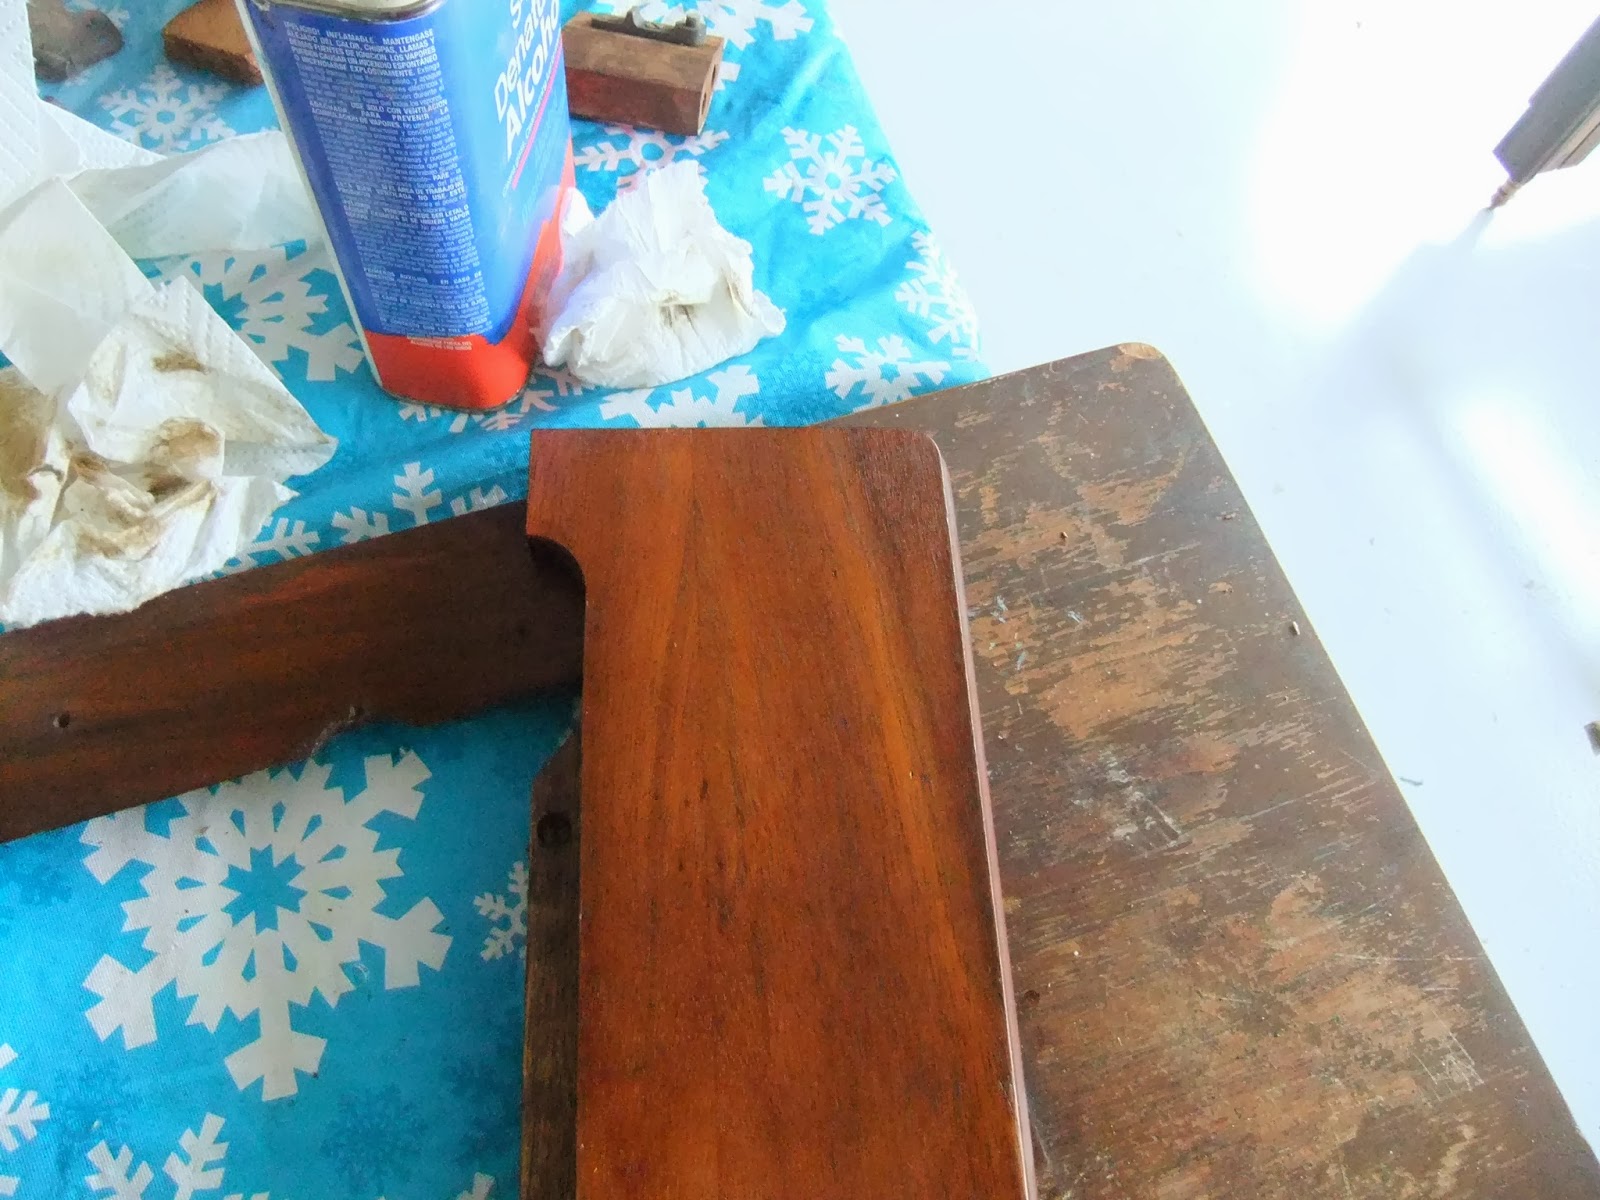
  • Apply Liquid Wrench, or sewing machine oil, let it set and gently wipe off, be very careful around the decals. I tried olive oil for this, as well it seemed to work as good if not better than the other oils.  

In the pictures above, you can see the results.  The darker sections have been oil cleaned.  If your machine looks good after this, STOP.

In Freddie's case, she is looking cleaner, but there is more work to do. From the beginning, there was something weird about Freddie's finish.  Some places, have crazing, others are rough like sandpaper, and then there are those grey spots.  After some research, I feel pretty certain the hot, humid summers, that Freddie spent stored in an attic, cause the original shellac to fail resulting in the problems I see.

Warning: 
 I'm not an expert, the following is the process I used on Freddie.  I stumbled on this by accident when some metal polish got onto one of the rough painted parts.  It worked for me, but may not work for you.  I guarantee that the materials used have the potential to permanently ruin your machine's finish.  Always try restoration methods on a hidden spot first.  Mixing household chemicals can be dangerous.  Please use common sense, wear gloves, work in a well ventilated area, and proceed with caution at your own risk.

Step 2:  The Much Harsher Approach   
  • Avoiding the decals, apply metal polish (I used Brasso) to a small area of the machine about  3" x 3".
Brasso contains ammonia and alcohol, both of which will soften, dissolve, and remove shellac.  Ammonia will also remove the gold color from your decals leaving them looking silver or white.
  •  Gently, rub in a circular motion with the pads of your fingers adding a few drops of oil to reduce the friction and keep the metal polish "wet".  The polish will turn brown as it lifts the old darkened varnish and embedded dirt. 

  • Wipe off with a soft cloth.

  • Add a few drops of oil or liquid wrench and wipe again to remove any gritty residue.  


  • Move to the next section and repeat. 


I used a q-tip and did this very carefully with a light hand on the worse of the decals.  Freddie's decals were already half silver when I got her so, I'm not too worried about keeping them perfectly gold.  Lucky for me things turned out fine.

  • When finished do a final wipe down with a damp cloth to be certain all grit is removed, then wipe dry. 


What's Actually Happening?

From what I know of shellac and the polish I used, the ammonia and alcohol in the polish are softening the shellac, and the grit is breaking it up, effectively removing most if not all of the damaged shellac.  


The polish smooths out the roughest areas.  It may take more than one application.


In the end, Freddie's rough spots are much smoother, but her lines remain.  She is also more lackluster in parts where the shellac was removed. So on to Step 3.

Step 3:  Bringing Back the Shine

it is excellent at telling you how to deal with that damaged shellac finish once you have it clean.   

On the bed, where cleaning wasn't as aggressive, I still had some of the original shellac and followed the instructions from the site above.  In other places, I had no choice but to add a new layer of shellac.  


WOW!  She sure is shiny!  

And if you are after that super shiny showroom finish, then I guess you could stop here.

But as I see it a super shiny finish combined with signs of obvious wear, like chipped paint and missing decals looks funny and screams I just put a fresh coat of shellac on this old machine.

It reminds me of a story that my Museum Practices professor told us about his first restoration project.   It was a very old gun.  It came to him filthy, grungy, and in pretty bad shape.  He worked diligently and cleaned that gun til it sparkled like new money.  He was very proud of his work until he showed it to his supervisor who pointed out that he had committed one of the great sins in museum restoration.  By making it so clean and shiny, he had removed the patina and with it some of the value.  Instead of looking like a well cared for old piece with the natural patina of age, it looked like a replica.  He never forgot his mistake. 

At this point, Freddie doesn't look like a replica, but she does look like a restoration job taken a step too far.  To remedy that, we go to step 4.

Step 4: Changing the Shine to a Glow.
  • First, make sure to give any shellac a day to really dry well.  
  • The using super fine 0000 Steel wool go over the surface avoiding the decals.  The goal here is to soften the shine, and smooth out any accidental ridges or drips in the shellac.  Wipe it clean.
  • Next, add 3 very thin layers of shellac.  Let that dry overnight.
  • Then, go back with 0000 steel wool again, only this time go over the whole machine being very gentle with the decals.  Wipe clean. This should make the surface appear satiny.
  • You can stop at this point, or you can add a coat of high quality paste wax and buff well for a lovely glow.  BTW, all 3 pictures above were taken with a flash. 
I still have to put a few parts back on, but I think Freddie Mae, the woman, would approve.

** UPDATE**
I just found a this post by Miriam over on The Quilting Board.  Great post, with lots of pictures.  It shows another way, not using metal polish,  to deal with damaged shellac.  
Wish I saw this sooner. 

Coming in Spring
(or once the weather warms up)

Refinishing Freddie's Cabinet and Treadle